What this covers
- Create a dedicated automation identity and External Client App.
- Keep the private key in the CI secret store and upload only the certificate.
- Verify the target without printing credentials into build logs.
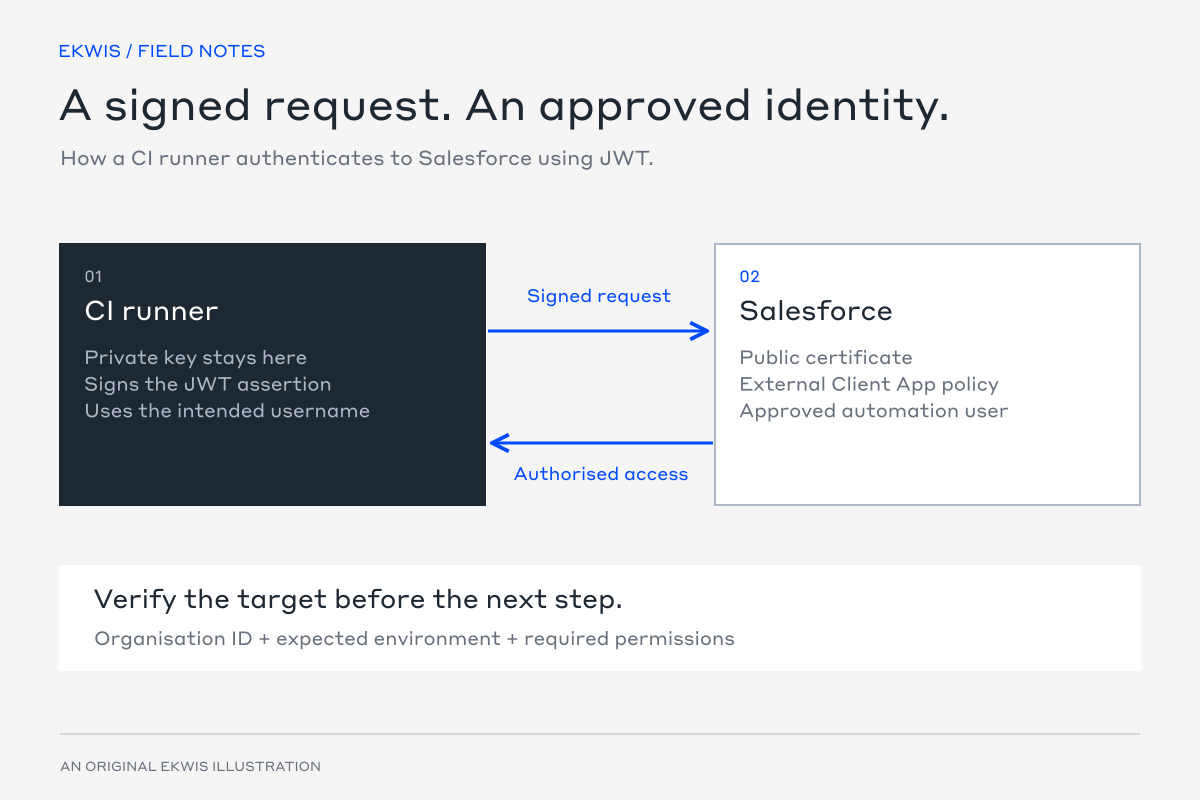
A CI runner needs to authenticate without asking a person to open a browser for every job. With JWT bearer authentication, it signs a request using a private key. Salesforce checks that signature against the app’s public certificate and the approved user before granting access.
The identity still determines what the job can do. Use separate production and non-production configuration, with only the permissions the relevant pipeline needs.
Set up the identity and application
| Item | Decision |
|---|---|
| Automation user | A dedicated identity with the required API, metadata, test and deployment permissions. |
| Target endpoint | The approved My Domain or login URL for that production org or sandbox. |
| External Client App | JWT bearer enabled, the public certificate uploaded and the intended user authorised. |
| CI environment | Secrets and approvals scoped to the environment that can use them. |
| Owner and rotation | A named owner for the user, app, private key and certificate expiry. |
Generate the private key and certificate
Run these commands in a restricted working directory on a trusted machine. They create a 2048-bit RSA key and a one-year self-signed certificate. Only the certificate is uploaded to Salesforce.
umask 077
openssl genpkey -algorithm RSA \
  -pkeyopt rsa_keygen_bits:2048 \
  -out salesforce-ci.key
openssl req -new -x509 -sha256 -days 365 \
  -key salesforce-ci.key \
  -subj "/CN=salesforce-ci" \
  -out salesforce-ci.crt
chmod 600 salesforce-ci.key
The example creates a key readable by an unattended job. Store it in the CI platform’s secret-file or encrypted-secret mechanism, materialise it with restricted permissions for the job and remove that temporary copy afterwards. Do not put the key, a literal passphrase or its contents into the repository or logs.
If your organisation requires a passphrase or an external key store, design and test the whole runner authentication path around that requirement. The example is not a substitute for that policy.
Configure the External Client App
- Create the External Client App in Salesforce Setup.
- Enable OAuth and JWT bearer authentication, then upload salesforce-ci.crt.
- Select the OAuth scopes required for this automation; avoid granting broader access by default.
- Configure the permitted-user policy and authorise the dedicated automation user through the supported app policy.
- Record the consumer key as the client ID used by Salesforce CLI.
- Store the expected username and target endpoint alongside the environment configuration.
New integrations should follow Salesforce’s current External Client App guidance. Existing Connected Apps and org policies may differ, so confirm the path supported by the organisation and release you are using.
Authenticate and confirm the target
The following assumes the CI secret-file mechanism has placed the PEM key at the shown temporary path. The client ID, username and endpoint are supplied by the CI environment. The JWT command does not need a client secret.
sf org login jwt \
  --client-id "$SF_CLIENT_ID" \
  --jwt-key-file "$RUNNER_TEMP/salesforce-ci.key" \
  --username "$SF_USERNAME" \
  --instance-url "$SF_INSTANCE_URL" \
  --alias ci-target

sf data query \
  --target-org ci-target \
  --query "SELECT Id, Name, IsSandbox FROM Organization"
Check the organisation ID and sandbox flag against the expected target before validation or deployment. Pass --target-org to subsequent commands rather than relying on a shared runner’s default org.
Diagnose the layer that failed
| Symptom or check | Where to look |
|---|---|
| The user is not approved | User status, permitted-user policy and the app’s authorisation assignments. |
| Signature or certificate failure | The public certificate and private key must be the matching pair. |
| The wrong org responds | The username, instance URL and environment-specific configuration. |
| A time-bound assertion is rejected | Runner clock synchronisation and the JWT validity window. |
| Login succeeds but a later action fails | The user’s API, object or deployment permissions and that action’s requirements. |
Make rotation part of the working setup
Record certificate expiry and the owner responsible for replacing it. Test replacement credentials through the actual runner and app policy before retiring old material, using the overlap or rotation path the org supports.
Keep secrets away from untrusted pull-request jobs. A successful login proves access for that identity; release readiness still depends on the selected target, permissions, reviewed change and validation.
Official references
- Salesforce CLI JWT login — Salesforce Developers
- External Client App JWT setup — Salesforce Developers
- Salesforce CLI release notes — Salesforce CLI
- OpenSSL req command — OpenSSL Documentation